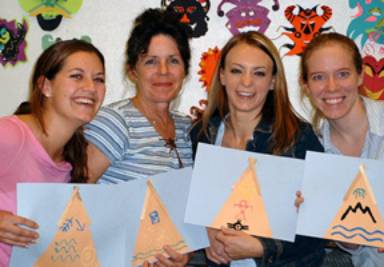
Sand Painted Teepees
Grade
2
ART
207-04, Group 1
Lindsay Sampson, Kelly Knapp, Sara Durfee, Roberta Gibson
Objectives:
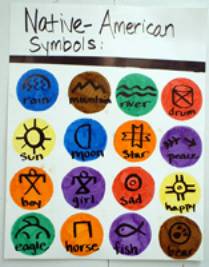
1. The students will learn the meanings of different symbols and signs in the Native American culture.
2. The students will learn the meanings of the different colors in the Native American culture.
3. The students will learn about line drawing.
4. The students will learn how to apply sand to paper with glue design.
5. The students will learn the meanings of the different colors in the Native American culture
Students Materials:
1. Newspaper
2. 9"X12" light blue construction paper
3. Brown construction paper teepee
4. Glue
5. Craft sticks
6. Pencil
7. Q-tips
8. Assorted colored sand
9. Plastic Spoons
Teacher Materials:
1. Poster board with Native American designs, symbols, and colors with their meanings.
2. Scissors
3. 9"X12" brown construction paper
4. Previous students artwork
Vocabulary:
1. Sanding painting, Native American, symbols and signs, teepee, line drawing
Procedures:
1. Introduction: Discuss the basic history of Native American sand painting and its symbolic meanings.
2. Glue the brown construction paper teepee onto the 9"X12" piece of light blue construction paper.
3. Glue two craft sticks onto the two slanted sides of the teepee, one stick per side.
4. Pick three Native American Symbols or designs that represent you and draw them onto the teepee with a pencil.
5. Choose appropriate sand colors for designs.
6. Trace your pencil design with glue. ONE COLOR DESIGN AT A TIME!
7. Spread glue with a toothpick/Q-tip, as needed, to make a thicker line.
8. Sprinkle colored sand over glue design. Shake excess sand onto newspaper.
9. Repeat step 8 until all glue designs are covered.
10. Closure: Hang student's art work and discuss what they learned about the Native American culture.
Suggestions and/or Comments:
Most of the class liked the project. Some students even said it was a favorite because it allowed them to be creative in expressing how they feel and/or they could tell a story about themselves using the symbols.
*Artistic Development: Grades 1st-2nd
During this age period, children
are developing line and shape making skills as well as their coordination with
scissors, tools, glue sticks and modeling clay. When instructors motivate the
children, it gives them confidence to create things important to them such as
family, friends, pets, or nature.
The children tend to draw things that are important to them in their lives, but
most frequently are drawing people. At this time, children also tend to make
all figures based around geometric shapes. Such as trees are rectangles with
circles on top. The people that the children draw tend to start out as a circular
shape with arms, legs, and a head attached to it.
At these stages of drawing, children also start to show their knowledge of
spatial relationships. They do this by not having random objects or people
floating all over the paper but attached to something like a clown sitting on a
swing. They will also show us detail with things such as a hurt toe will be
enlarged.
If children cannot remember things that have happened to them that would give
them ideas to draw, they will repeat themselves with symbols that they are used
to. This is when the adult needs to give some ideas i.e. losing a tooth,
getting a new pair of shoes, getting a hair cut, or anything else that will
motivate the child to draw something new to their picture.
When children are drawing their symbolic pictures of things around them in
their environment, they tend to not use the actual color of the object; instead
they will use a green face with purple hair representing a picture of
themselves. Even though the children know the actual color, they tend to choose
the colors they like. The adult doesn’t have to correct them by telling them
the correct but instead pointing it our around them i.e. Kelly I like your
purple skirt, or that is a nice picture of a brown dog. There are other ways to
do color perception with children through nature. The adult can take the
children out on a walk and then come back and write down everything they
remembered seeing with the correct actual color. Another way is to study a
picture done by an artist and pick out the colors that are in the painting.
Texture is also introduced at this time to children. They are learning to do
different collages with different types of material. They are also relating the
textures to real life objects such as sand paper for sand at a beach, or foil
for a rocket ship.
During the ages of six and seven children are starting to draw their symbols
one at a time and relating them to one another with space. They are able to
draw a base line for the sky and for the ground symbolizing the in-between as
"air." They are very flexible with their base lines and not as
realistic. In order to make their conception of space in their drawing better,
there a number of things to do other than draw. The first is to say that the children
are doing any activity in the mountains. This will give them a chance to bend
their baseline. The topic of "picking fruit in an orchard" allows
them to draw a number of different baselines in their picture. Anything that
has to be done "underground" will show the baseline at the top with
the picture underneath.
All of these ideas are done to encourage the child to have a perception of
realistic symbols. The children will not encounter any problems if the adult is
helping the child out with different topics to branch off from.
**Cultural/Historical Background:
Sand painting is practiced by
many Native American tribes in the southwest, particularly the Navajos.
Researchers believe the Navajo learned the art of sacred sand painting from the
Pueblo Indians, who in turn learned it from the Anasazi and other earlier
peoples. There are two forms of sand painting, the first is used in the
traditional healing or blessing ceremony and the second is the art form.
Traditionally, the Navajo use sand painting in their healing or blessing
ceremonies to restore balance to the sick or to bless a new life, a new place,
or an act. The ceremony is
conducted by a singer or medicine man and can last anywhere from 2 to 9 days,
depending on the type of ceremony. If the ceremony is to heal a sick or ailing person, a large Hogan,
or hut, is built for the ceremony to be held in. During the ceremony, the singer and his helpers create a sand
painting design by trickling sand of different colors through their fingers
onto a base of neutral colored sand spread over the Hogan floor. (The different colored sands were originally
made by mixing charcoal, ochre, and juices from fruits, berries, and flowers,
with the sand). The patient is
then brought into the Hogan and placed on the sand painting. The medicine man then takes sand from
certain symbolic sections of the design, and rubs it onto the patient to absorb
the causes of the illness. When
the rites are completed, the sand painting is wiped away. *Due to the sacred elements of these
ceremonies, very few non-Navajos have ever seen a traditional sand painting
used in ceremonial rites.
During the middle of the twentieth century Navajo sand painting became an art
form. Today, Navajo sand paintings are sold commercially. Their designs have
religious as well as symbolic meanings. Although the designs used in commercial
sand paintings are for aesthetic purposes they give us insight into the Navajo religion
and culture. *All sand paintings sold today have one religious flaw, this is
the only way Navajo leaders would agree to the sale of these sand paintings.
Resources:
Severson, Leigh. Native
Americans. Huntington Beach, CA: Teacher Created Materials,
Inc., 1991.
Bahti, Mark. Navaho Sandpainting Art. Walsworth Publishing Company, 1978.
Herberholz, Donald, and Barbara Herberholz. Artworks for Elementary Teachers.
New York: McGraw-Hill Higher Education, 2002.
http://www.runningdeerslonghouse.com/webdoc123.htm